
Catering Requests lets restaurants, cafés, bakeries and caterers take catering inquiries on their own website. You list your catering packages, show them with the Catering Menu block, and let customers send a request with the Catering Request Form block. Requests arrive in a WordPress inbox and by email. You never need to write code.
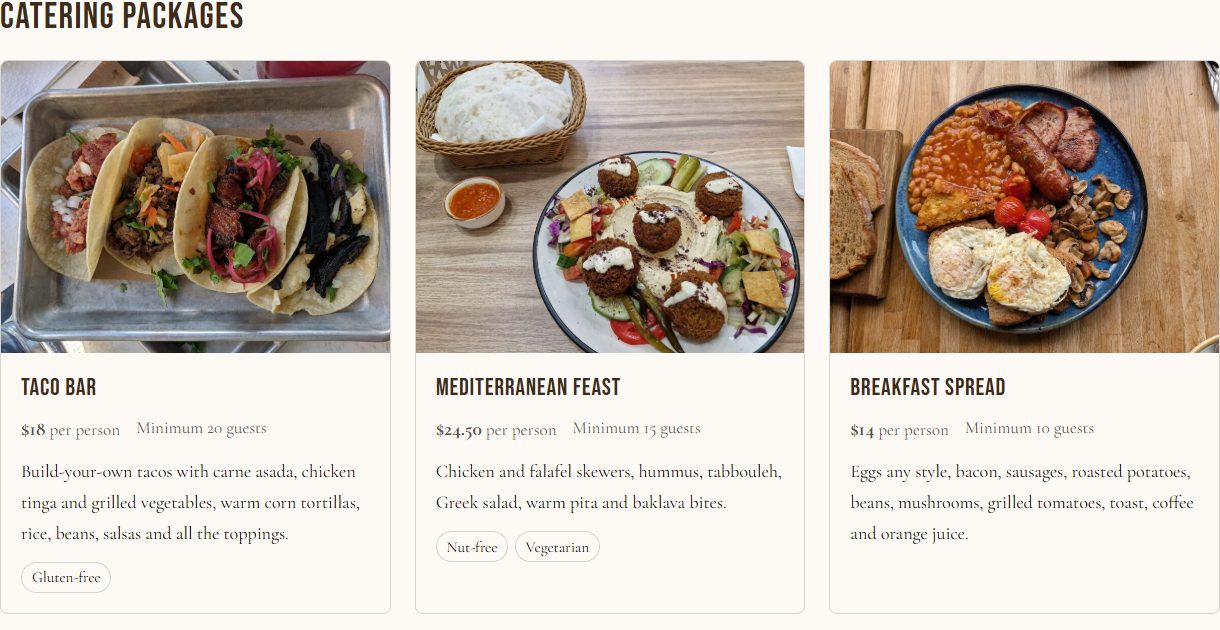
See it live: the catering menu and form, and the admin side (opens in one click, read-only)
Get it free: Web Integrate Catering Requests on WordPress.org, or download the 1.1.0 zip
Requirements: WordPress 6.6 or later, PHP 7.4 or later. It works with any block theme and is styled to match our Savor restaurant theme. No WooCommerce needed.
1. Install the plugin
- In your WordPress dashboard, go to Plugins → Add Plugin.
- Search for Web Integrate Catering Requests.
- Click Install Now, then Activate.
A new Catering menu appears in the dashboard, with three screens: Packages, Requests and Settings.
Updates: because the plugin comes from WordPress.org, WordPress shows new versions under Dashboard → Updates like any other plugin. Your packages, requests and settings are kept.
Installing from the zip instead: download the zip and keep it as it is (don't unzip it). Go to Plugins → Add Plugin → Upload Plugin, choose the file, click Install Now, then Activate Plugin.
Upgrading from Catering Requests 0.3
Before WordPress.org listed it, the plugin was called Catering Requests (version 0.3.x). The new version is a separate plugin in WordPress, so it does not replace the old one by itself. Your packages, requests and settings carry over:
- Go to Catering → Settings. Under When uninstalling, make sure Delete all packages, requests, dietary labels and settings when the plugin is deleted is not checked.
- Under Plugins, deactivate Catering Requests, then delete it.
- Install Web Integrate Catering Requests as shown above and activate it.
Your pages keep their Catering Menu and Request Form blocks. Don't activate both plugins at the same time.
2. Add your catering packages
A package is one thing customers can order for their event, such as a taco bar or a breakfast spread.
- Go to Catering → Packages and click Add Package.
- Type the package name as the title, for example Taco Bar.
- Below it, describe what is included: dishes, sides, drinks and anything else.
- Open the editor sidebar (the panel icon in the top right) and fill in Package details:
- Price per person. Leave it empty to hide the price.
- Minimum guests. Leave it empty for no minimum.
- Under Dietary Labels, add labels such as Vegetarian, Vegan, Gluten-free, Dairy-free or Nut-free. To add your own, type a new label and press Enter.
- Under Package photo, upload a photo of the food.
- Click Publish.
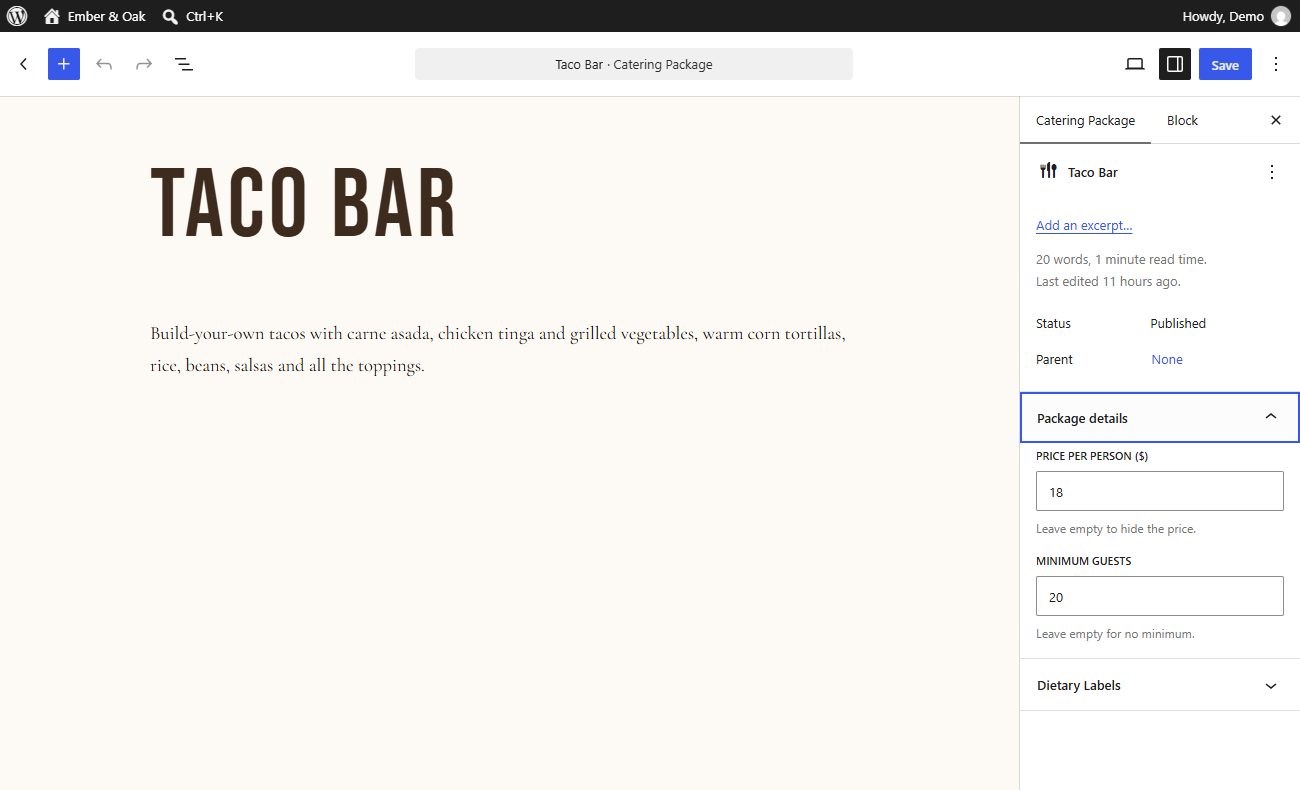
Repeat for each package. The Packages list shows each package's price and minimum guests, so you can check them at a glance.
3. Show your packages with the Catering Menu block
Catering Menu is a block you place on a page, not an item in the dashboard menu. The Catering menu in the dashboard is where you manage packages and requests; the block is what your visitors see.
- Go to Pages and open the page where your catering menu should appear, for example Catering. To start a new page, click Add Page.
- Click the blue + button in the top left corner of the editor and type
cateringin the search box. Two blocks appear: Catering Menu and Catering Request Form. Click Catering Menu to insert it.- Prefer typing? On an empty line, type
/cateringand choose Catering Menu from the list. - Don't see the block? Check under Plugins that Catering Requests is activated.
- Prefer typing? On an empty line, type
- In the block sidebar, choose how it looks:
| Setting | What it does |
|---|---|
| Columns | 1 to 4 cards per row |
| Order | Package order, Name (A–Z) or Price (low to high) |
| Number of packages | How many to show. 0 shows all packages |
| Show photo, Show description, Show price per person, Show minimum guests, Show dietary labels | Turn each detail on or off |
The cards use your theme's fonts and colors, so they fit both light and dark designs. You can also change the block's colors, spacing and font size under the Styles tab of the block sidebar.
New packages appear in the block automatically. You only insert the block once.
4. Add the Catering Request Form
- Edit the page where customers should send requests. This can be the same page as the menu, or a separate page such as Catering Request.
- Click the blue + button in the top left corner, type
cateringand click Catering Request Form. Each page can have one form. - In the block sidebar under Form settings, you can change:
- Show estimated total: adds up price per person × servings as customers choose packages.
- Button text: the default is Send catering request.
- Thank-you message: shown after the form is sent. Leave it empty for the default message.
- Click Save (or Publish for a new page).
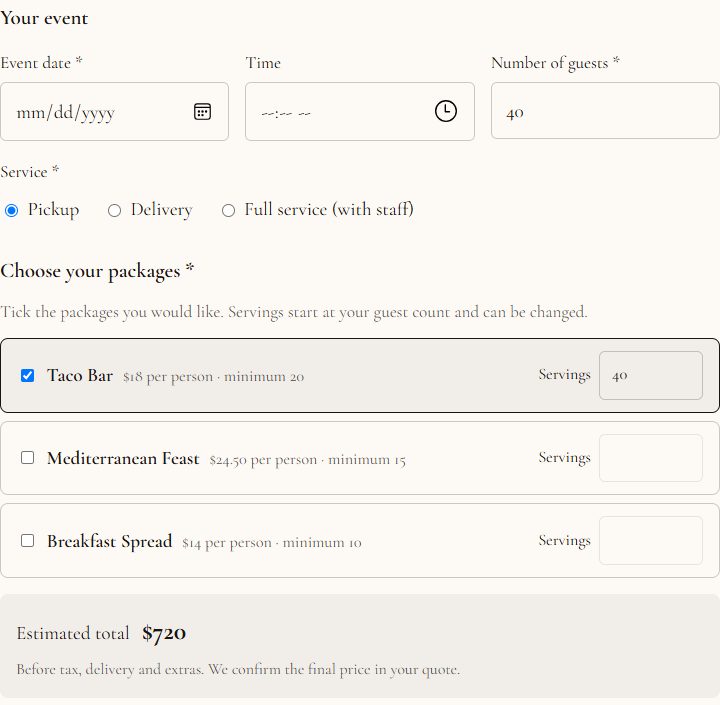
What customers fill in:
- Your event: event date, time, number of guests, and the service: Pickup, Delivery or Full service (with staff). For delivery and full service, the form also asks for the event address.
- Choose your packages: customers tick the packages they want. Servings start at the guest count and can be changed. Each package's minimum guests is checked.
- Estimated total: price per person × servings, added up live and clearly marked as an estimate before tax, delivery and extras.
- Your details: name, email, phone, and a box for dietary needs, allergies or anything else.
Spam protection is built in: a hidden trap field, a minimum fill-in time and a limit on how many requests one visitor can send. It needs no outside service and no puzzle for your customers.
Using Savor? Savor's Events & catering section has a Start Planning button. Link it to the page with your request form.
5. Manage requests
Every request is saved under Catering → Requests. A badge on the menu shows how many requests are new.
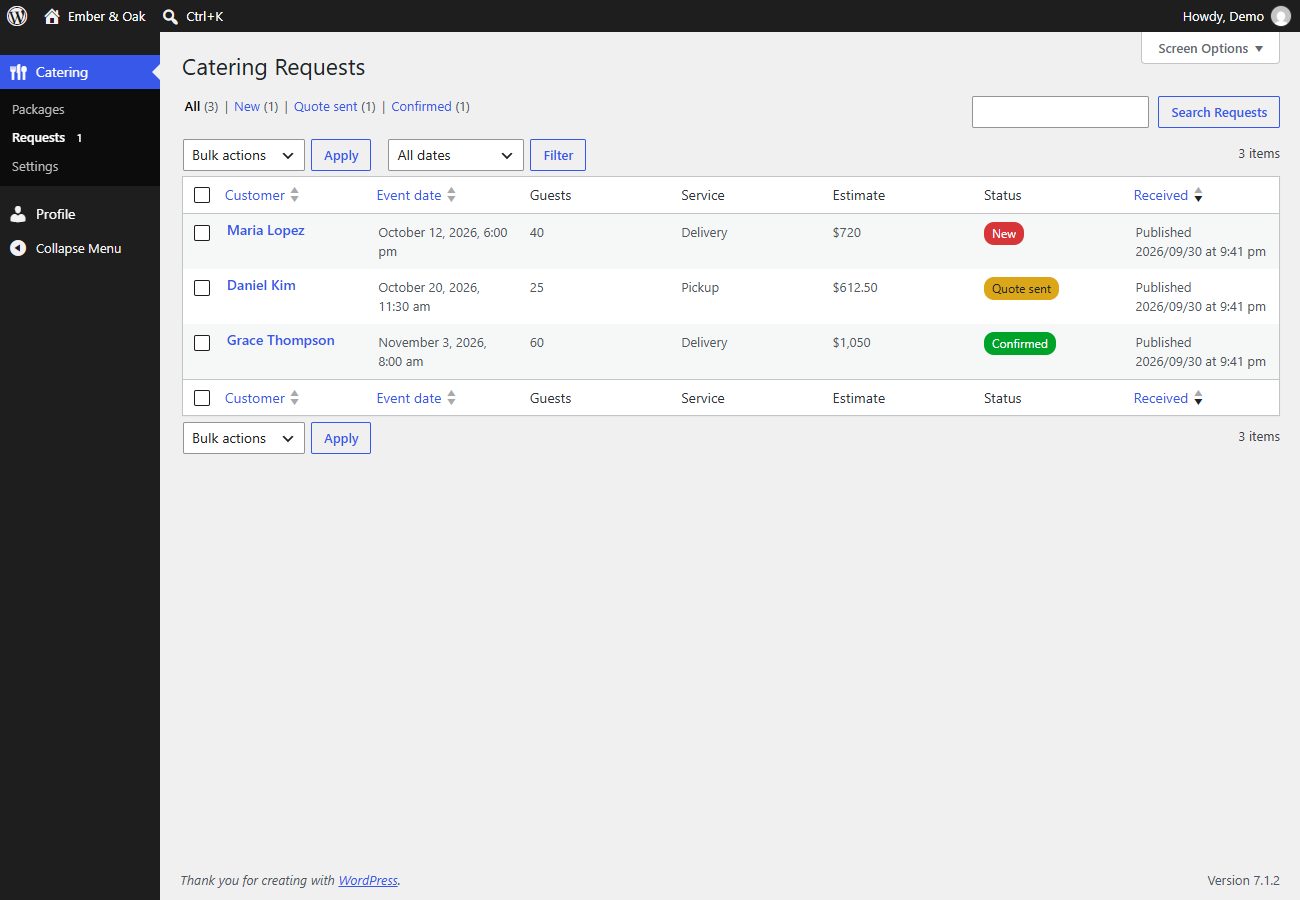
The list shows the customer, event date, guests, service, estimated total, status and when it was received. Use the links above the list to see only one status, and the search box to find a customer.
Click a customer's name to open the full request: contact details, event details, the packages with servings and subtotals, and the customer's dietary notes.
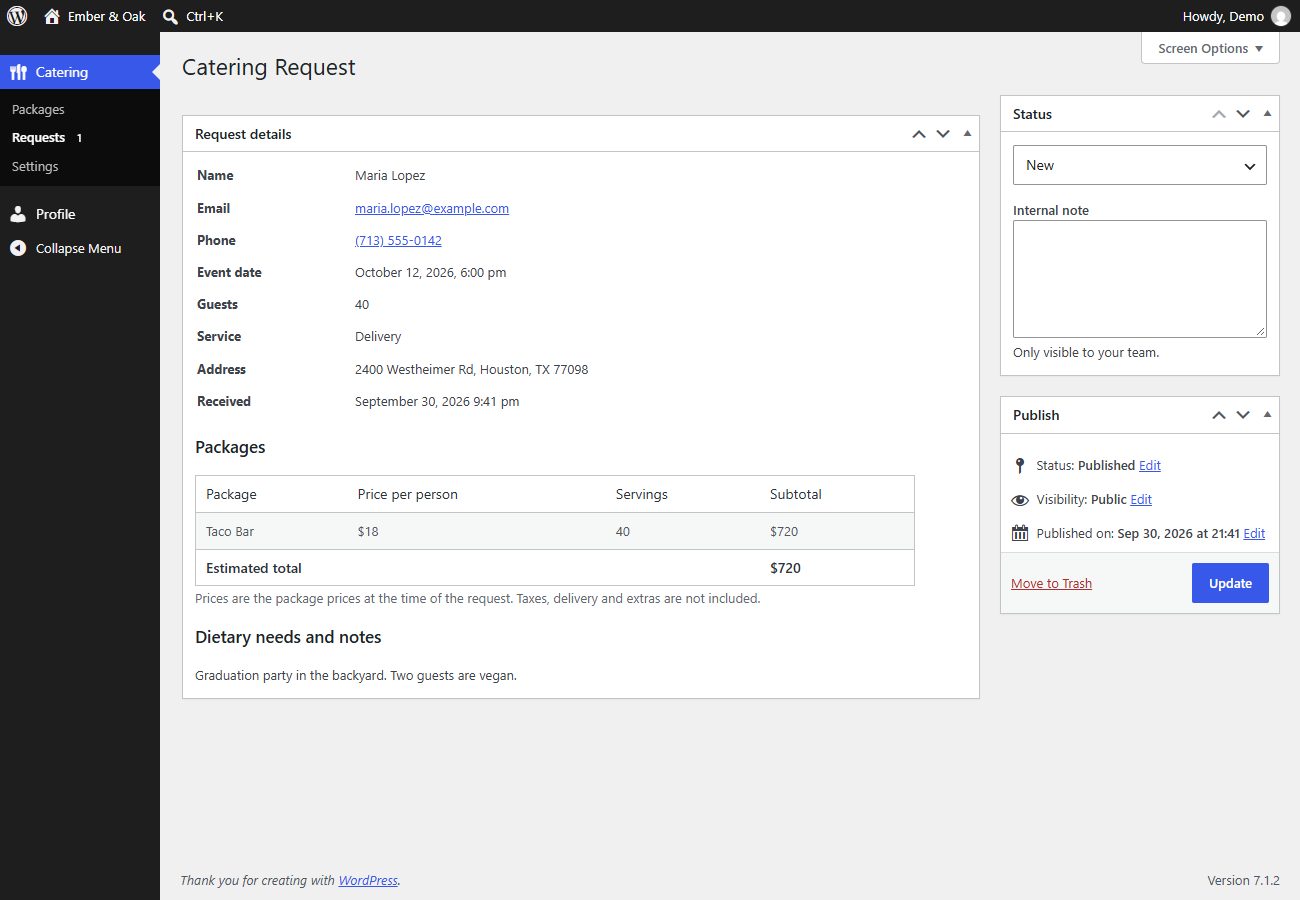
In the Status box on the right:
- Status: move the request along as you work on it: New, Quote sent, Confirmed, Completed or Cancelled.
- Internal note: notes for your team, such as the quote you sent or who is handling the event. Customers never see it.
Click Update to save.
The prices in a request are the package prices at the time it was sent, so later price changes don't affect old requests. The estimate does not include taxes, delivery or extras: you confirm the final price with the customer.
6. Settings: emails and booking rules
Go to Catering → Settings.
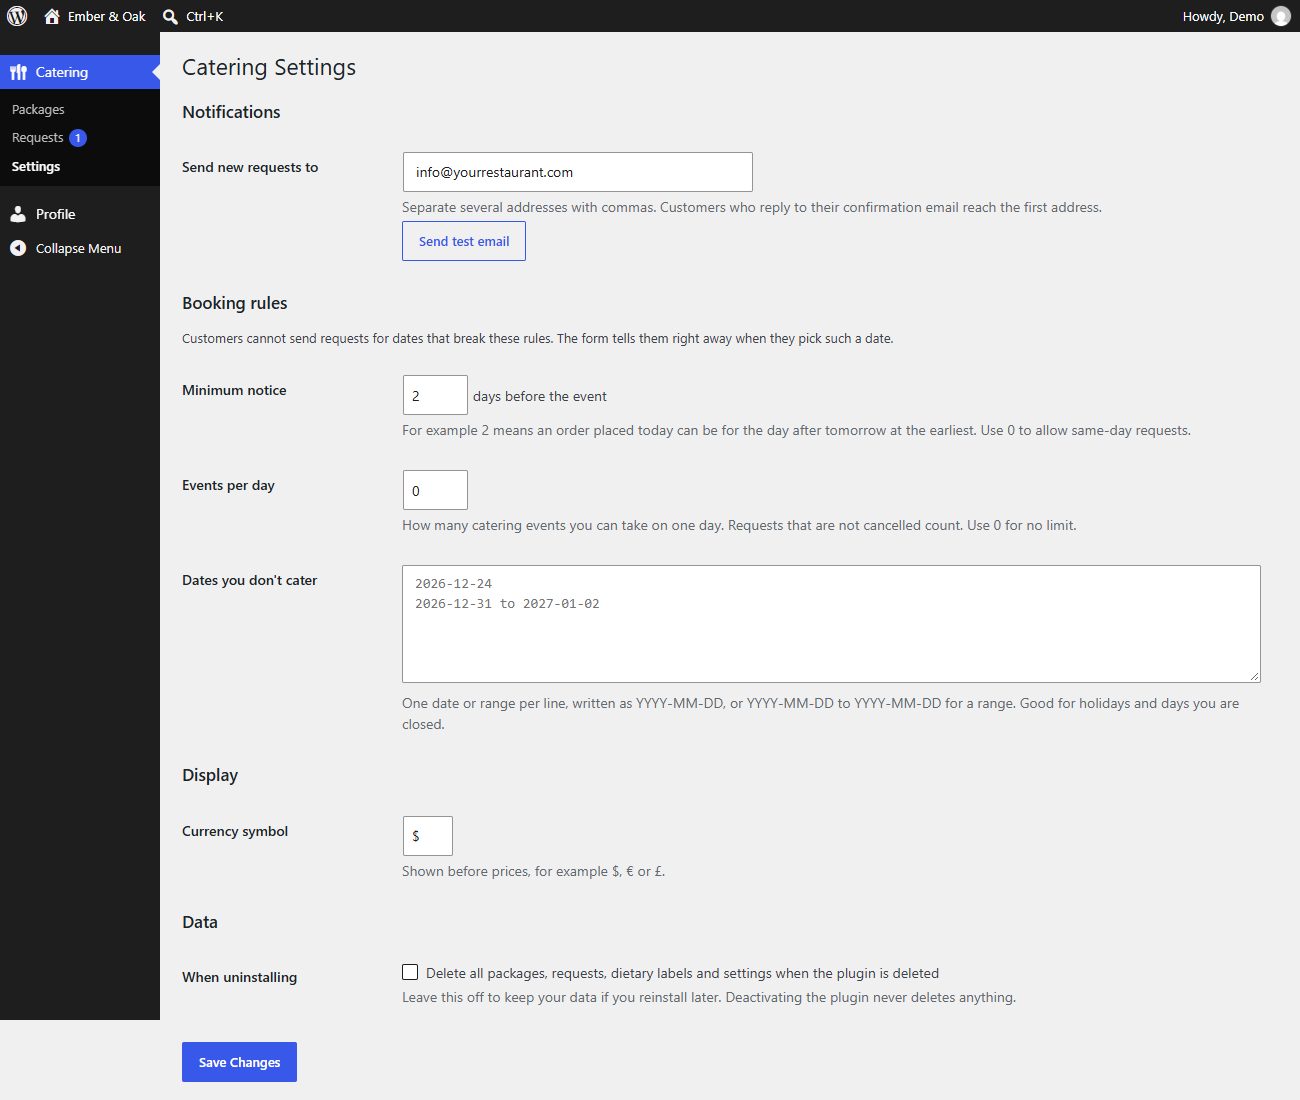
Notifications
- Send new requests to: the email address that gets each new request. To notify several people, separate addresses with commas. When you reply to the request email, your reply goes straight to the customer. Customers who reply to their confirmation email reach the first address.
- Send test email: check that your site can send email. If the test does not arrive, look in the spam folder first.
Customers also get a confirmation email with a summary of their request.
Booking rules
The form checks these rules as soon as a customer picks a date, and tells them right away if the date is not available.
| Setting | What it does |
|---|---|
| Minimum notice | How many days ahead customers must order. For example 2 means a request sent today can be for the day after tomorrow at the earliest. Use 0 to allow same-day requests |
| Events per day | How many catering events you can take on one day. Requests that are not cancelled count. Use 0 for no limit |
| Dates you don't cater | Holidays and days you are closed. One date or range per line, written as 2026-12-24, or 2026-12-31 to 2027-01-02 for a range |
Display and data
- Currency symbol: shown before prices, for example $, € or £.
- When uninstalling: tick this only if you want all packages, requests, dietary labels and settings deleted when you delete the plugin. Leave it off to keep your data if you reinstall later. Deactivating the plugin never deletes anything.
Click Save Changes.
7. Privacy
Catering Requests does not send any data to outside services. Requests stay in your WordPress database.
- Privacy policy: go to Settings → Privacy and open the policy guide. Catering Requests adds suggested text about catering requests that you can copy into your privacy policy.
- Customer data requests: the plugin works with WordPress's tools under Tools → Export Personal Data and Tools → Erase Personal Data, so you can send a customer their data or delete it when they ask.
Frequently asked questions
Do I need WooCommerce?
No. Catering Requests works on its own. Customers send a request, not a payment: you confirm the details and the final price with them.
Can I hide the price?
Yes. Leave Price per person empty on a package, or turn off Show price per person in the Catering Menu block.
Is the estimated total what the customer pays?
No. It is an estimate from your package prices, before tax, delivery and extras. The form says so next to the total. You confirm the final price in your quote.
I am not receiving request emails.
Requests are always saved under Catering → Requests, even if an email fails, so nothing is lost. Use Send test email under Catering → Settings to check delivery. If the test does not arrive, your host may block WordPress email. An SMTP plugin, which sends email through a real mail account such as Gmail, usually fixes this.
Can I change the currency?
Yes. Under Catering → Settings → Currency symbol.
Does it work without the Savor theme?
Yes. It works with any block theme and uses your theme's fonts and colors. It is designed to look especially good with Savor.
Can I use it with Elementor, Divi or the Classic Editor?
Yes, with shortcodes (version 1.1.0 or later). Add a Shortcode element in your page builder, or paste into the Classic Editor:
[catering_menu]shows your catering packages.[catering_request_form]shows the request form.
They look and work exactly like the blocks. You can add options:
| Shortcode | Option | Values |
|---|---|---|
[catering_menu] |
columns |
1 to 4 (default 3) |
orderby |
menu_order, title or price |
|
limit |
how many packages to show (0 shows all) | |
show_image, show_description, show_price, show_min_guests, show_diet |
yes or no |
|
[catering_request_form] |
show_estimate |
yes or no |
submit_label |
text for the send button | |
success_message |
text shown after a request is sent |
For example: [catering_menu columns="2" orderby="price" show_diet="no"] or [catering_request_form submit_label="Ask for a quote"].
Where do I get help?
Post in the plugin's support forum on WordPress.org, or contact us. Include your WordPress version, a link to your site and a short description of the issue.